Wifi-Audit | Midterm Project | JH5363

Okay so my project ended up working decently well. The idea was to make a wifi-auditing device which ran dictionary attacks on nearby wifi networks and sent the discovered data over my phone’s hotspot to a web server that displayed the data.

Site Link: https://wifi-audit.glitch.me/

GitHub Repository: https://github.com/boatshaman/wifi-audit_pind
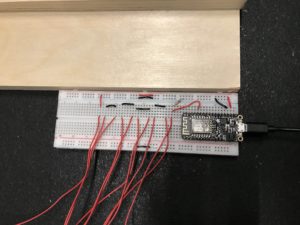
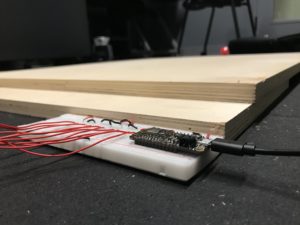
Equipment:

  • 1 x Feather HUZZAH ESP8266 microcontroller
  • 3 x leds
  • 3 x 220 ohm transistors
  • 1 x button
  • 1 x 10k ohm resistors
  • smartphone to provide wifi hotspot

Process:

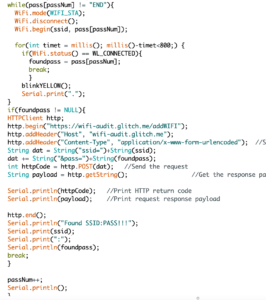
First I created the dictionary attack program to attempt to connect to nearby wifi-networks. This used a list of the “100 most common wifi-passwords” and attempts to connect to the nearby wifi SSIDs with the passwords one by one and if it successful then it sends the SSID and password up to the web server I made on glitch.com

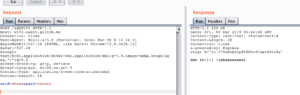
The difficult part of this was getting the geolocation of the device and associating that with the cracked wifi SSID/passwords. For this I used this really awesome free API called Skyhook precision location (link). Basically, if you make an account (to get an API key) and send up a POST request with XML data containing the SSIDs (network name), BSSID (mac address), and RSSI (signal strength) of all nearby wifi networks, it will send back a response with the latitude and longitude of your position. You can also specify to receive the street address if available which is really awesome!

All I did was gather all the wifi-data from the ESP8266, send it up to my web server hosted on glitch.com, have the web server turn the data into xml data and POST that to the API service and receive the response. It would parse the XML response and turn it into a javascript object by using this great library!

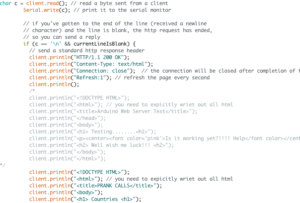
If for some reason there is an error in the skyhook api or parsing xml or whatever could possibly happy, a page can be queried at /success and it will either contain a 0 or 1 depending on if the site correctly received the coordinates. After sending the wifi information up to the server, the wifi-audit device queries this webpage (wifi-audit.glitch.me/success) and if the site sends back a 0 then the wifi-audit device knows to resend the wifi data to the server, starting the whole locating process again. It does this until the server correctly identifies the location. Once the location is correctly received by the server, any subsequent wifi SSID:pass pairs that are sent up are going to be attributed to that latest geolocation reported.

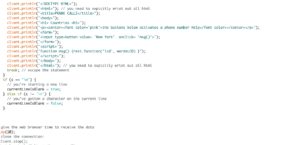
When the wifi-auditing device is plugged in all one needs to do is press the big blue button and the magic begins. First the wifi-auditor will send up the geolocation to the server. Then it will get all the nearby wifi-networks which it could possibly connect to (meaning no WPA2 Enterprise networks) and attempt to connect to each one by one. If the WAP sends back a disconnected signal (meaning the password was wrong) then it moves onto the next one saving time! Otherwise it waits 8 seconds before moving on. If it finds one that works then the wifi-auditor connects to my smartphones wifi hotspot and sends the data (reliably and legally) to my server!

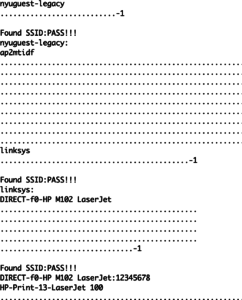
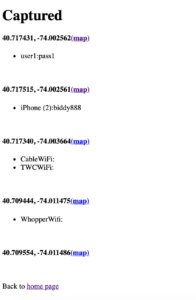
The websites home page displays the last seen coordinates and then the list page displays all the discovered SSID:password pairs for every location tested. Each location also has a link to a google maps pin of the GPS coordinates as well so its easy to visualize where it was found. Here is some blank passwords it found:

Here’s it cracking wifi’s on the street at 5 am!! :

Huzzah!


Midterm_Teletubby

Demo

For my midterm project, I decided to switch my topic from temperamental sheep to “Teletubby.” Teletubby is an empathetic elf who cares and understands your inner feeling. At my draft attached below, in order to know how a person feels, I use the force sensor as input data in the beginning. Teletubby will be able to know your mental condition by analyzing the frequency and volume from your answering voice. However, I ended up using a force sensor because I think users could be more interactive with the device. 

I began with creating an animation from p5.js, and linked it with arduino by using arest.

p5.js Draft
p5js

To start the interaction, people could input their stress level by pressing the force sensor, and the data will be mapped from 0 to 100, and people could see how much force they pressed by looking to the bar shown on the screen. If the force sensor has been held for a static level, within a range 5, for 3 seconds. In order to control the timing, I wrote a variable, count, and if the difference between data from the last loop and a new loop is smaller than 5, the count will be added one. 

After Teletubby got your stress level, he will either smile and wiggle or showing a sad face depends on your condition. If your stress level is lower than 65, this means your at good condition, otherwise, you’re not feeling well, and he will make you feel his empathy by showing a sad face to you. 

This is actually one of the difficulties I met. In order to have two facial expressions, I was intending to use two different EL wire, red and blue. The EL wire I bought is the one which needs to use two 1.5v battery and control different three lighting mode by clicking the button. In order to connect it with Huzzah and control by it, I solder three wires to make the circuit works. However, once I tried to use two EL wire at the same time, one of it will start blinking and the other one gets really dim, so I gave up using both. I ended up using only one EL wire and make it rotate by using a servo, but I forgot that the servo couldn’t be rotated up to 180 degrees. 

If I got more time on this project, the first thing I would do is solving the EL wire problem. I would try to figure out how to make two EL wire work simultaneously. After this, I’d like to add sound for Teletubby, so the user could have a stronger connection and interaction with him. Last but not least, I’d like to refine my prototype and come up with something people can really hang on their wall and play with him every day. 

Final Prank Pager

I would like to end with saying the idea of the Prank Pager works, however the random generator was left out, but there is a New York phone number that prints on the lcd. There was also a problem with the pathway executing the function, since with wifi it has to be typed “/lcd?params=hello”. Since we were trying to connect executing the function of the LCD with the button the website screen. If we do continue this project in the future we will look into executing the function through an html button and create the pager into something else rather than entertainment.

True Relaxation Fulfillment Incredible The Workplace Efficiency Maximization Tool Of The Future

Heyo! The two videos + images do quite a bit of explaining, so I’ll let those do most of the talking.

After recording the first video I changed my code such that the page refreshes more when the buttons aren’t pressed and refreshes less once they’re all held down.

I still was unable to get my battery working, which sucks; also the auto-play turned back off, and this time it was for seemingly no reason. I’ve tried everything I can think of, but hopefully I can get it working by tomorrow morning.

Overall I’m pretty happy with the execution of this project. It’s clear in its intent and the final thing is almost exactly how I’d originally envisioned it, sans timer function on the computer. I did a bunch of stuff I’d never done before–particularly with html, which I’m kind of proud of–and I feel good about the amount of time and energy I put into this project. Last but certainly not least, I’m so glad I could finally make something useful, and if anyone has any leads on local businesses that might be interested in trying this tried and true workplace efficiency maximization appliance, please do let me know.

Thank you for you time,

Julian Otis

NYU Class of 2021

Messenger Robot Final

I decided to continue with my idea of a messenger robot in the context of accessibility. For example, if for some reason you can’t move, you can control this robot with your computer to send and retrieve items with another person.

From last week, I added/improved on a few things. Mainly, I increased the torque of the wheels so the car could actually move. I created a gear system and made the drive gear smaller than the driven gear. I also decreased the wheel size. Then, to help it move, I reduced friction wherever I could and reduced the weight. I took off a motor (from 2 to 1) to make it lighter and also because it only needed one. I also added a lipoly battery so it could be mobile.

I added an ultrasonic sensor that would return the distance in cm of how far away the target is, in this case the other person who you’re sending the robot to. I put a small container area at the top with an “item goes here!” sign as a signifier to where you should put the item you want to send.

I made a p5js sketch as well, where you can control the robot. A small button at the top left sets pin 4 as output. Hovering the mouse on the left side of the screen turns the motor off, while on the right side of the screen turns it on. At the bottom, it says “I am ___ cm away from my target!” which is the ultrasonic sensor reading outputting to the user.

I ran into a few problems involving both the robot and the sketches. It took me a long time to figure out how to get it moving, experimenting with the gear system and constantly trying to find ways to increase the torque. When I plugged in the lipoly battery, it wouldn’t work – I had to put wires in the male header, and then run them to the power and ground lines. The ultrasonic sensor was also pretty hard to implement, which required another custom function and more code in p5. For the p5js sketch, I came up with a blank screen in the beginning, but just forgot to import the dom library for the buttons. When I was using it later, the mouse hovering didn’t work, but Che Yu helped me figure out that the feather was taking to many requests, so we used a boolean to make sure that the number of requests was controlled.

Lucky Cat Wave

I simplified my original plan and instead created a cat that waves to grant your wishes! For my setup, the microcontroller (server) returns a physical response (the cat waving) upon the browser’s (client) request.

Just submit your wish through the form on the browser UI and the lucky cat will wave for each character in your wish to grant it 🙂

In terms of the interaction, the command “Make a wish!” would prompt the user to enter his/her wish. Upon clicking the “Wish it” button (which affords clicking/pressing), the prompt returns a feedback “Wishing for _______ ?”. In addition to this, the “bell” attached to the cat’s collar would light up while its right paw waves. Once the waving is done, the light goes out.

The light as a signifier was helpful when I was first testing the servo on the cat. Because I put the ledOn and ledOff commands before and after the servo command, I could tell whether the servo was responding without waiting on it forever. As for the physical cat, I used a combination of modeling clay (everything but the arm) and Play Doh (just the arm). My guess is that the servo wouldn’t move because the clay arm was too heavy.

It works 🙂
let url = "http://192.168.1.106/"; // string to hold URL
let servoVal = 0; // variable that holds the servoVal
let input = "";
let button, greeting, wish;

//function preload() {
//  // Ensure the .ttf or .otf font stored in the assets directory
//  // is loaded before setup() and draw() are called
//  font = loadFont('assets/MADE Evolve Sans Bold (PERSONAL USE).otf');
//}

function setup() {
  createCanvas(windowWidth, windowHeight);
  frameRate(10);
  
  input = createInput();
  input.position(300, 405);

  button = createButton('Wish it');
  button.position(input.x + input.width + 5, 405);

  greeting = createElement('h1', 'Make a wish!'); // works because of the p5 dom library!
  greeting.position(300, 345);

  textSize(120);
  
  button.mousePressed(load);
  const wish = input.value();

}

function draw() {
  background(255, 204, 0);
}

function load() {
  let ledMode = "mode/4/o";
  console.log(url+ledMode);
  httpGet(url+ledMode, 'json');

  wish = input.value();
  console.log(wish);
  if (wish!=""){
    let ledOn = "digital/4/1";
    console.log(url+ledOn);
    httpGet(url+ledOn, 'json');
    greeting.html('Wishing for ' + wish + ' ?');
    input.value('');
    servoPos();
  }
  else {
      greeting.html('Make a wish!');
  }
}

function servoPos() {
  console.log('servoPos function works');
  servoVal= wish.length;
  let cmd;
  servoCmd ="servo?params=";
  httpGet(url+servoCmd+servoVal, 'json');
  console.log(url+servoCmd+servoVal);
  let ledOff = "digital/4/0";
  console.log(url+ledOff);
  httpGet(url+ledOff, 'json');
}

Midterm Prototype | jh5363

So for the midterm I decided I wanted to something with finding poorly secured WIFI networks with the portability of the ESP8266.

My original plan was to use a GPS module I had picked up and once I had found a weakly protected network I would send the SSID, Password, and coordinates up to a web page. Then the webpage would be able to display a map of all the networks found with the corresponding SSID and password so if you ever knew you were going to be around a certain area and wanted to access a wifi network you could.

Big problem I encountered is that the GPS module was giving me basically no real readings about the coordinates. I dunno if the board is just faulty or if it isn’t able to pick up signal that well within the city but supposedly the type I picked up was meant for automobiles so I would think it would work a little better than that. (part = ublox GPS6MV2)

SO I scrapped the GPS part of the project for now and continued to work with the finding weak passwords part of the device. The difficulty here is that there are a limited number of passwords I would be able to test for each WIFI network for two reasons: first, it sometimes takes up to 5 seconds to connect to the WIFI network from the ESP8266 and therefore we would have to wait until five seconds have passed in order to judge the validity of each password guess, and second, there is very limited memory on the ESP8266. Because of the first problem we know we can’t do a full brute-force which would check every possible letter/number combo and because of the second problem we are limited to the number of password guesses we can store within the memory natively. That being said, I used a list I found of the top 100 most commonly found wifi passwords.

Now the plan is to attempt to crack the password using one of the most common passwords and once I successfully connect to a wifi-network I would send up the SSID and password to the web server. This would of course work theoretically because once connected to the wifi network the ESP8266 would have internet access and could make any GET or POST request it wants.

Here are pictures of the code responsible for the POST request from the microcontroller and the serverbside code which gets the data and stores it:


And here is an example of the password cracking in action (it actually works!):

Minor problem thought, haven’t quite figured out how to make the HTTP requests go through. For some reason the client keeps on failing to connect but this should be fixable. Here is a screenshot of a request and response I simulated through Burp Suite to ensure the server is working appropriately:

I think this is going to be a really cool project but I need to solidify a couple things first. One main thing is that if it finds a “network” and corresponding password but that network isn’t a true network for internet access (such as a printer network as shown in screenshot) or there is an additional authentication mechanism (as in nyu-guest) then it won’t be able to send that request to the server. What it should do instead is store the found credentials and send them when it finds a network which it can reach the internet through. Or it could drop them because they aren’t necessarily useful for gaining network access but maybe could be useful for something else so I think its best to keep them in consideration for now. Additionally there is the question of if I want to keep pursuing the GPS aspect of the project. I think this is probably the coolest part of it considering without it all that is visible are a list of SSIDs and passwords but we have no idea where they are. This is fine if we just wanna check the ones in our surrounding area but say I wanted to jump on my skateboard and ride around the city finding weak wifi passwords, at the end I would just have a list of SSID/Password combos and not know where to go to find the WIFI networks. There is a arduino library I found which uses surrounding wifi networks and one wifi network which I can connect to in order to determine the coordinates using a google API. I can’t say how reliable this is but it’s a possibility and I would definitely be interested in trying to get it to work with GPS somehow.