Final Project Update: Programmable Pedal

Since last week, I’ve made a few changes to my project. I added the Max object “sm.ladder~” from the built-in Max package “smFilterPack” (you can find the package manager under File → Show Package Manager). The “sm.ladder~” package acts as a high pass, filtering out high frequencies to change the sound. This in combination with the “lores~” object (which changes the harmonic content) creates a more realistic simulation of a wah-wah guitar effect. I am still using the sewing pedal to control the effect.

I also created a simple visualizer in p5. The text moves up and down based on the volume of my guitar playing. This visualizer would be more useful if it could give information about what effect settings I’m using; for example, if it could display which effects are currently on and which ones are currently off, and the settings I have for each effect. This would create a cool graphic interface that would be easier to read than the Max patch. The image below is a good example of what I’m talking about. Unfortunately, I didn’t get that far, but it’s definitely something I want to explore. 

I did a short run through of the “wah-wah” effect and the visualizer in the video below.

Final Project: Programmable Guitar Pedal.

For my final project, I have created a set of guitar pedals that allow me to manipulate Max as I play my electric guitar. I can turn effects on and off by stepping on “guitar pedals” made out of cardboard and adjust the intensity of effects using the “expression pedal.” The “guitar pedals” are connected to the ESP8266 and work the same way as button switches. The pedals have two pieces of aluminum foil with wires attached to them, separated by a layer of cardboard. By stepping on them, I squish the cardboard, so the aluminum foil pieces touch, completing the circuit. The expression pedal is a repurposed sewing pedal, that functions as a potentiometer. Since the wires of the sewing pedal aren’t designed to work with the breadboard, I soldered the ends of the wires to pins. I used Arduino to send OSC messages to Max based on the pedal input. In the video below, I do a run through of how the pedals work.

I plan on submitting this to the IDM Showcase. For the IDM Showcase, I’d like to experiment with using Max to manipulate other applications: for example, to create visuals in P5 based on my guitar input. The expression pedal has a lot of sonic potential that I’ve like to explore as well. I’d also like to create a sturdier interface, as the guitar pedals I’m using now are pretty flimsy.

Final Project Update

For my project proposal, I set up a Max patch with a bunch of cool guitar effects that I could run my guitar signal through. To create a guitar pedal that can manipulate these effects, I first need to find a way to get my ESP8266 to control these effect parameters in Max. I initially thought that Open Sound Control would work for this. Looking online, I saw similar projects that used the iPhone Touch OSC app to control Max. However, I wasn’t able to get Max to get input from the Touch OSC app. I also looked into the OSC for Arduino library but didn’t find anything similar to my project. I am currently still looking for a method. 

Final Project Proposal

For my final project, I would like to design a wireless guitar effects pedal that can be attached to an electric guitar, similar to the Guitar Wing, or this custom guitar effects unit designed by Dereck Song. I created a prototype using Max. I used different keys on my computer to turn effects on and off. I did a run through of that in the video below. It is also possible to control the intensity of effects using the mouse. For my final project, I would like to use sensors and buttons on my microcontroller to control these parameters. I would also like to create an interface that resembles the Guitar Wing, and that can be easily attached to a guitar.

These are the timestamps for when different effects occur in my video.

(0:04-0:11) This is the “clean” sound of the guitar, with no effects. I’m using a Fender Stratocaster electric guitar.

(0:12-0:18) This is the guitar going through distortion.

(0:20-0:25). This is the guitar going through a phaser.

(0:26-0:32). This is a guitar going through delay.

Guitar Wing:

Dereck Song’s custom guitar effects unit:

March 29 Homework

  1. Button Journal: For this assignment, I created a google document that updates every time I press a button on my microcontroller. This admittedly isn’t particularly useful for anything.

2. Fender GT40: The Fender GT40 is a internet-enabled device that I find inspiring. It is a guitar amp that is Wifi and Bluetooth enabled. You can download guitar effects (distortion, echo, virtual guitar pedals) from a Fender smartphone app, Tone and upload it to this amp. I find this really interesting, but I’m not sure how I could build something like this. Unfortunately, full size guitar amps can be dangerous to work on. I have a small 9v powered guitar amp that might be better for this project. I think Max/MSP or p5 might be useful for this kind of thing.

NYC Internet Infrastructure

Metrocard: The MTA now offers MetroCards that are linked to your bank account. They do not need to be refilled. In order to do this, the scanners would have to be connected to the internet

Vending Machine: Vending machines and ATM machines use the internet to process payments from debit and credit cards.

LinkNYC station: This is a LinkNYC station. It provides an interactive map (like Google Maps), free Wi-Fi, and device charging, among other things. It also provides trivia, such as famous events that have happened on this date. To do all these things, this LinkNYC definitely uses the Internet.


Drum / Glitch Machine

For my midterm project, I initially wanted to make a drum machine. I believed that the program p5 would work well for this. The p5.sound library has a lot of musical examples for inspiration, and I’ve worked with p5 before.

First, I made a p5 sketch that allowed me to play drum sounds and loops by pressing keys on my laptop. I had 8 different drum sounds that I could trigger by pressing the keys “a” to “h” on my computer. I also had two loops that you could turn on or off by pressing keys “z” to “v”. I did a run-through of that in 0:02-0:14 of the video below.

Next, I wanted to create a physical interface that would be easier to use. I wanted to use large button switches to trigger drum sounds and loops. I believed they would give a more natural tactile feel. To do this, I created an Arduino sketch that could draw information from button switches in real time. Then I wired up 8 button switches. I wanted to transfer the data about the microcontrollers from my Arduino sketch to my p5 sketch. I used p5’s built-in loadJSON function to get data from my Arduino sketch through my web browser. At this point, I ran into a problem. I couldn’t figure out how to get my p5 sketch to draw information from my microcontroller in real-time. When I ran my p5 sketch, I could trigger a drum sample if I pressed down on the button switch before the sketch finished loading. But after that, I couldn’t use the button switches to interact with the sketch. Also, the drum sounds that I tried to trigger would buffer, distort, and play indefinitely. Basically, the sounds would glitch.

I decided to rename my project the “glitch machine.” Glitches can sometimes sound cool in music. For example, there is a style of EDM called glitch that uses the effect as a rhythmic device. Glitches are also sometimes used in post-rock and alternative rock as a sound effect. I decided to see if I could create interesting sounds using my glitch machine. I put drum, guitar, bass, and keyboard sounds in my sketch. While it’s not what I initially intended to create, I think my “glitch machine” has the potential to create interesting sounds. I did a run-through of this from 0:20 to 0:30 of my sketch. I used the refresh button on my web browser to switch between different sounds. For this reason, I had to record the audio and visuals separately: I couldn’t press refresh, press down on buttons, and hold my phone to film all at the same time.


Love Machine

For my “love machine”, I had the idea to create a game based on switches. The two players would answer yes or no questions. Pressing “yes” would cause the red LED to go off. Pressing “no” would cause the blue LED to go off. The players would record the number of answers they had in common. The game could come with a booklet or app that tells the players how to rate their compatibility based on their answers. I think the affordances are the switches that allow the user to manipulate the circuit. The signifiers are the red and blue buttons on the interface. I think it would look even better with arcade-style buttons. I think that using LEDs actually uses the body in an interesting way. If you have two players blurting out answers at the same time, I think there is more room to backtrack. And writing out answers is much slower. Using LEDs is more fun, immediate, and accurate.

Hands Free Switch Based on a Guitar Pedal

I based my switch on a guitar pedal. In order to close the circuit, you step on it, as with a guitar pedal. The inside of my switch has two pieces of aluminum foil separated by a thin piece of cardboard. When you step on the pedal, the two pieces of aluminum touch. Two wires from the circuit are connected to these foil pieces, and this completes the circuit. I also installed a push button.

Vending Machine

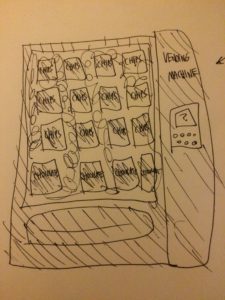
Yesterday, I observed my roommate Michael use a vending machine on the first floor of our dorm. Michael was trying to get a chocolate chip cookie from the bottom row of the vending machine. The vending machine has a touch screen display that gives step by step instructions. The machine tells you to swipe your card or insert money to begin. So Michael swiped his card, since he didn’t have any cash on him. The vending machine takes a couple of seconds to load after you swipe. The vending machine automatically takes $2.50 out of your card. Then it tells you to press the code of the snack you want. The vending machine has a small keyboard below the display. So Michael entered the code for the chocolate chip cookie. The cookie is supposed to then dispense. When you are finished with the transaction, the vending machine tells you to select another item, or press “complete” on the card reader (you don’t need to do this if you pay by cash). If the thing you bought was less than $2.50, pressing complete means that the vending machine changes the charge. If you don’t press complete, the vending machine asks you to buy another item, to use the rest of the $2.50. Once you press complete, the machine also tells you “Thank you, and have a great day.” Then after about 15 seconds, the display returns to its home screen. If you don’t press complete, after about 40 seconds the machine moves to the “Thank you, have a great day” screen, and then back to the home screen.

Unfortunately, the cookie didn’t dispense. There is a spiral shaped piece of metal that holds the food in place. The plastic casing of the cookie got stuck on this piece, and the cookie didn’t dispense. While this is disappointing, it is probably unavoidable. Since it would be impossible to design a frictionless vending machine, there is always a possibility that the food will not make it out the vending machine. However, It would be nice if the vending machine could have a sensor or device to determine if the food was dispensed and made it to the receptacle, and refund you if the food doesn’t dispense. Also, while this is more of a cosmetic improvement, it might be nice if the machine had a loading screen, since it takes a while to load after you swipe your card. Even though the machine clearly tells you to press complete on the card reader, a lot of people don’t do this. This means someone else could use the remainder of the $2.50 you paid. Perhaps the vending machine could have a big sign on it telling you to make sure to press complete. Or it could automatically take the whole $2.50 if you don’t press complete or select another item within 40 seconds. This would use negative reinforcement to get people to press complete.

When their food is stuck in the vending machine, many people will try to shake the vending machine to get it out. As far as I know, I don’t think this actually works. I suppose this would be an affordance of the vending machine: it is too heavy for an average person to pick up or move much. The touch screen display affords the user the ability to manipulate the machine through touch. The keyboard that you use to enter the code for the item you want affords you the ability to press letters and numbers. There is also a money scanner for dollar bills, and a coin slot. The money scanner affords you the ability to insert dollars, and the coin slots affords you the ability to insert coins. The messages from the machine are signifiers, with the exception of the last message that tells you to have a nice day.