Plumbob IRL

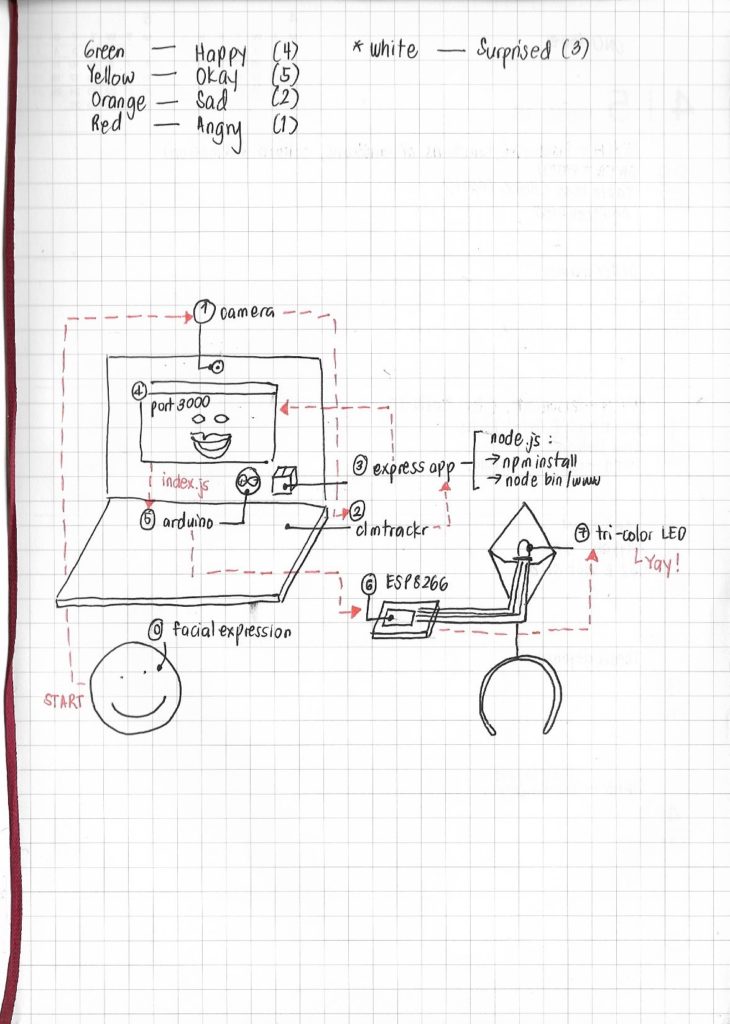
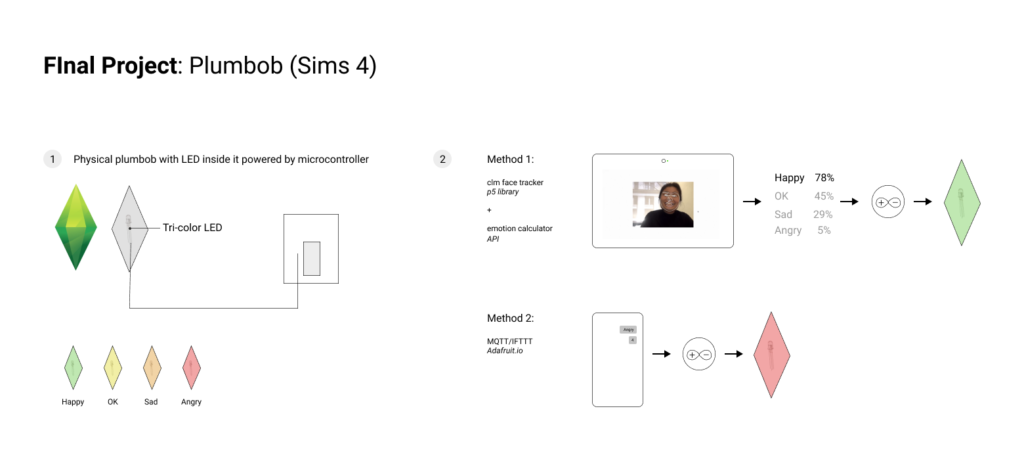
I built and designed a Sims-inspired plumbob that actually responds to a change in one’s facial expression. I used clm trackr, a javascript library that tracks facial expression on images and videos using a face tracking model.

This past week, I worked on:

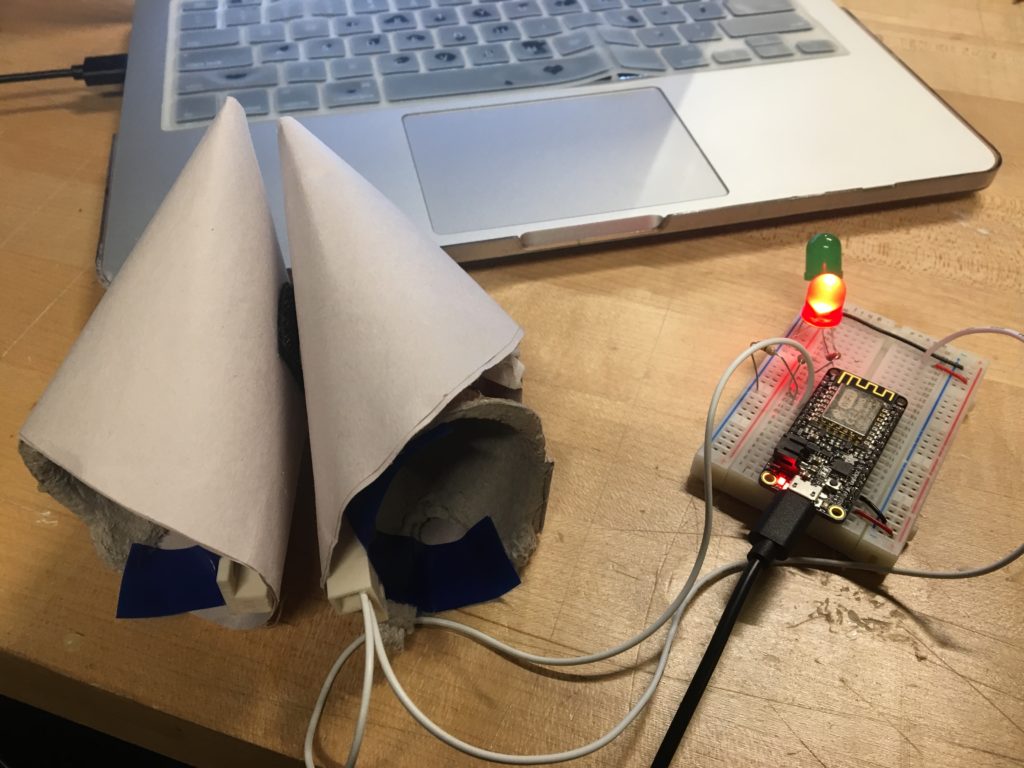
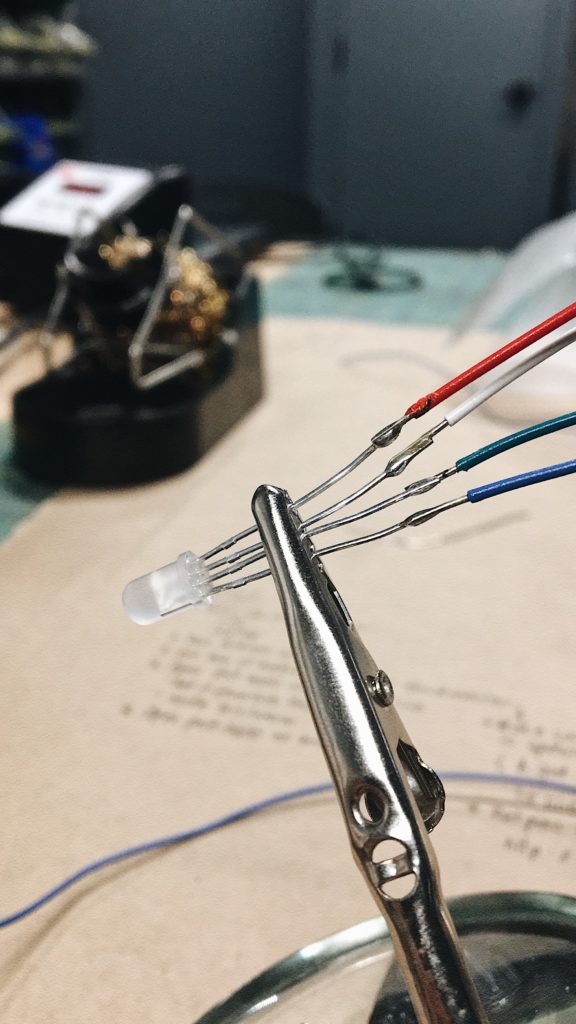
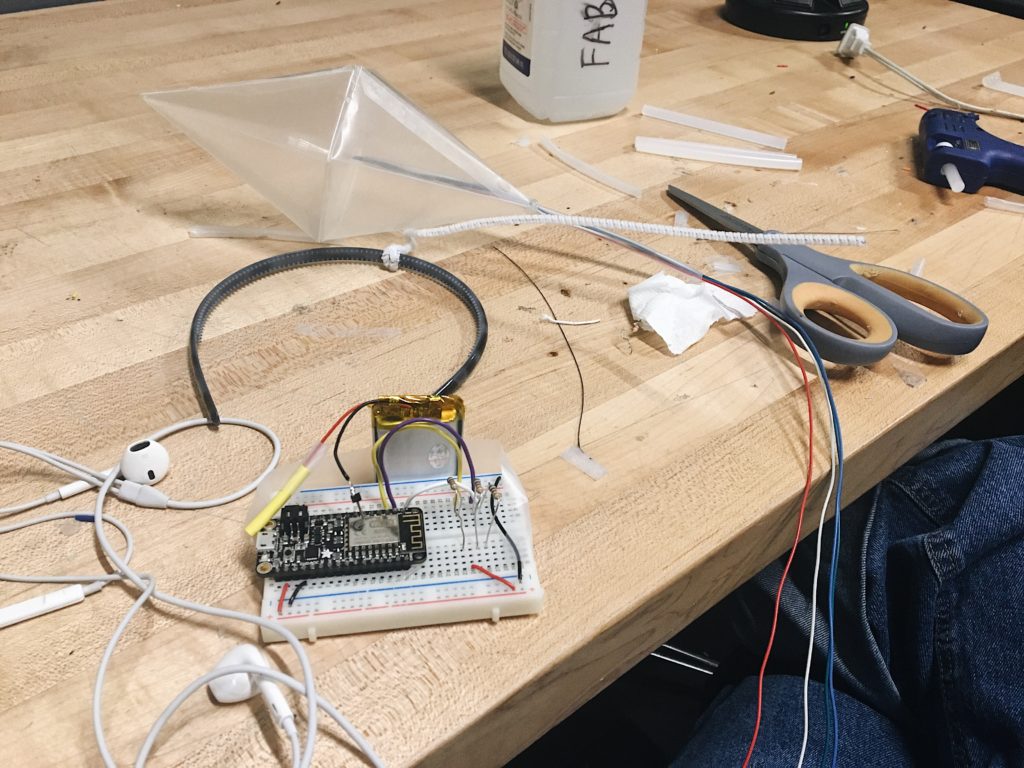
  1. Hooking the lipoly to the microcontroller via soldering to headers.
  2. Communicating to the ESP 8266 wirelessly using REST. This was a helpful refresher for me on how aREST worked. I also gained insight on what syntax looks like for carrying out multiple custom functions that do not require inputs.
  3. Making an HTTP request in Javascript. Because I was working in Javascript, I had to find a way to make a GET request to update the url every time the model detected a significant change in the person’s facial expression. I ended up using Ajax + jQuery for this after Che Yu explained to me what jQuery does for you!
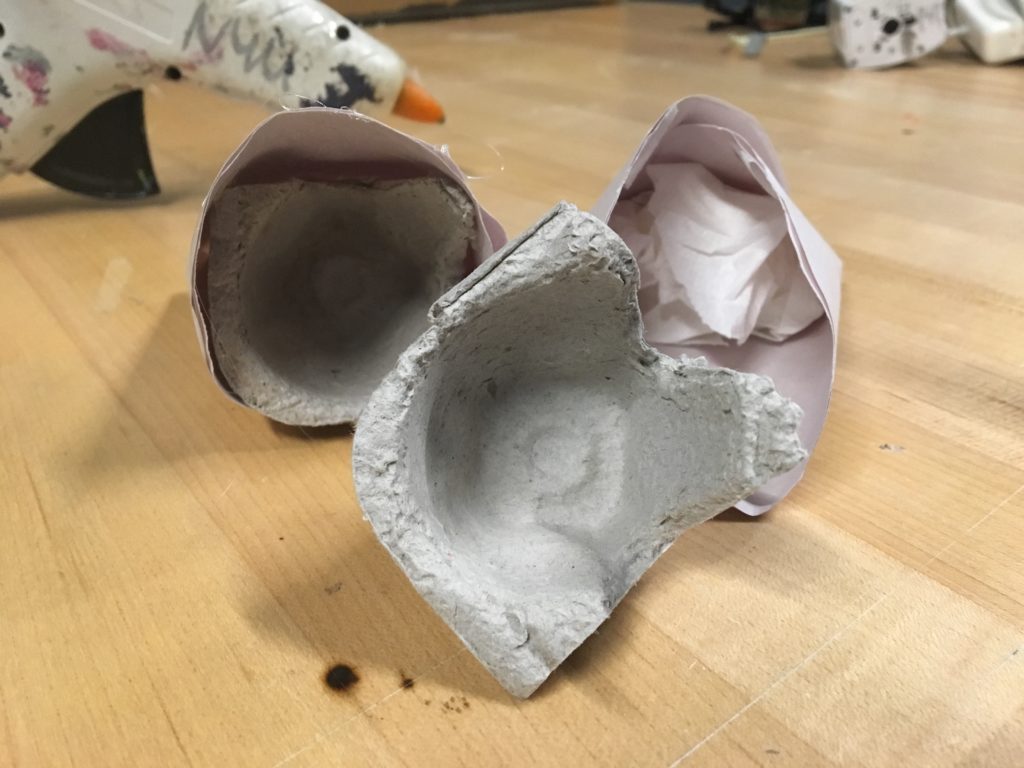
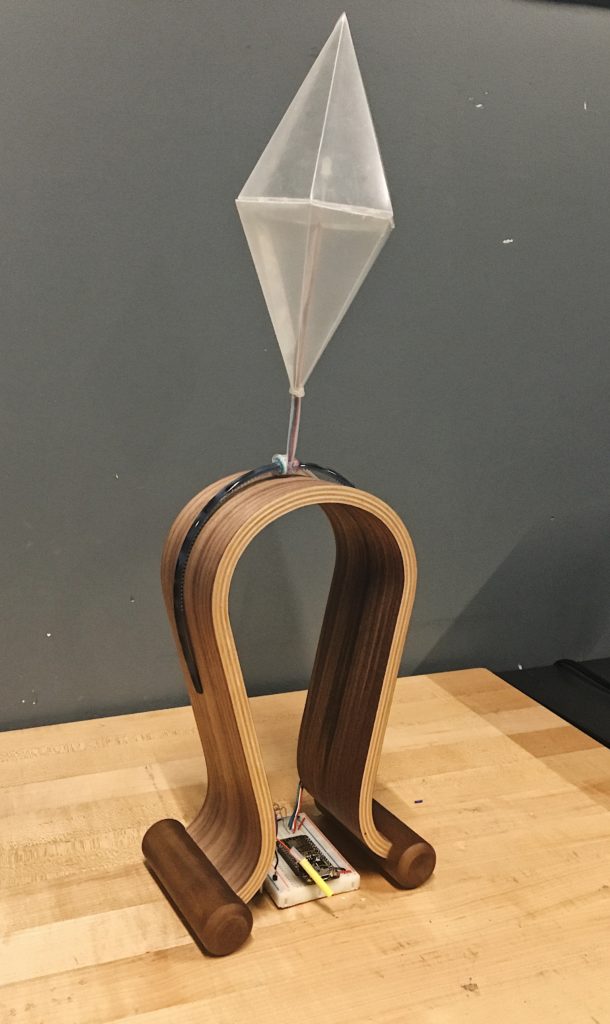
  4. Designing the physical interface. I spent most of yesterday figuring out, through trial and error, how best to set the device up in such a way that I didn’t need to explain what it was and how to use it, looked farther-from-prototype-looking, while still showing the “insides”– a feature I find very helpful (at least in my experience learning how things work!)


What it ended up looking like!

Code here!

Updated documentation:

Final Project Update

This week, I wrapped my head around the communication that goes between the clm library, express app, arduino, and the microcontroller. Moving forward, I will focus on building the physical aspect of my plumbob and making the connection wireless.

Mürror

Last week, I was able to experience Berk Ilhan’s Mürror. I enjoyed it mainly because it of its unusual trigger: a smile. The interaction was seamless, memorable, and personalized! I’m curious as to how it works– I would have loved to see what the mirror holds behind its surface.

esc

“Sorry, I have to take this”

I got really excited about last week’s IFTTT discovery and decided to make something I need–– a physical escape key for when I want to *gracefully* leave a conversation. Instead of asking a friend to come rescue you, just click a button to get a phone call you’ll have to excuse yourself for.

Given the urgency of the situation, I thought that a the trigger should be a simple push of a button– think big red world destruction button!

I programmed the Arduino to detect the state of the button (switch) so that if it’s pressed down, it will write an emergencyLevel of 100 onto the feed (see the three spikes towards the end of the feed line) and then built out a recipe on IFTTT that prompts a call to my number when it detects a value above 10.

I also wrote a script for my important caller

Video to follow!

Observation: Network Infrastructures

After reading Ingrid Burrington’s field guide to networks in NYC, I couldn’t unsee the devices and ‘marks’ of network as I moved around the city. Here are the memorable ones that I thought stood out from my routine path–– for different reasons.

12:03pm on 88th St bet 3rd Ave and Lexington

As i was walking to the 86th Street station, I noticed that one of the street lamps had added height to it. I recognized it, having read about it in the guide but did not remember what it was called so I took a picture of it to research on later.

Distributed Antenna System (DAS) • Helps distribute signal in under-covered areas; connected to fiber optic networks underground.

12:07pm, on the ceiling of the 86th Street Station: by the 6

Last month, I noticed right above the spot where I wait for the 6 train, that there were knobs marked with “DO NOT PAINT” in bold. I wondered then, why it was so important not to paint over these knobs– having no clue what they controlled or if they even moved at all.

Seeing this in the guide gave me an aha! moment:

Subway wireless networks • Provides wifi connectivity underground

The big tubes are labelled “RF CABLE” and “POWER AND FIBER”, suggesting where and how the device is connected. RF stands for radio frequency– I inferred this based on the guide. Apparently the signals from the base station (home base) are distributed to the connected stations via these fiber optic cables and converted into RF signals.

**Subway wireless networks- also a DAS!

6:20pm, view from the Arnold Library @ Parsons

Before grabbing dinner with some friends in the East Village, I got some work done. While staring out the window of Parsons’ library, I recognized yet another piece of network infrastructure– the microwave antenna– affixed on the rooftop of another Parsons building across the street (5th Ave).

Microwave Antenna • Wireless internet service provider that provides broadband services through a network of antennae

I like the contrast between the clunky device that seems to be reaching up and out and the classical style, architectural building that seems to have been there for decades, standing still.

Lucky Cat Wave

I simplified my original plan and instead created a cat that waves to grant your wishes! For my setup, the microcontroller (server) returns a physical response (the cat waving) upon the browser’s (client) request.

Just submit your wish through the form on the browser UI and the lucky cat will wave for each character in your wish to grant it 🙂

In terms of the interaction, the command “Make a wish!” would prompt the user to enter his/her wish. Upon clicking the “Wish it” button (which affords clicking/pressing), the prompt returns a feedback “Wishing for _______ ?”. In addition to this, the “bell” attached to the cat’s collar would light up while its right paw waves. Once the waving is done, the light goes out.

The light as a signifier was helpful when I was first testing the servo on the cat. Because I put the ledOn and ledOff commands before and after the servo command, I could tell whether the servo was responding without waiting on it forever. As for the physical cat, I used a combination of modeling clay (everything but the arm) and Play Doh (just the arm). My guess is that the servo wouldn’t move because the clay arm was too heavy.

It works 🙂
let url = "http://192.168.1.106/"; // string to hold URL
let servoVal = 0; // variable that holds the servoVal
let input = "";
let button, greeting, wish;

//function preload() {
//  // Ensure the .ttf or .otf font stored in the assets directory
//  // is loaded before setup() and draw() are called
//  font = loadFont('assets/MADE Evolve Sans Bold (PERSONAL USE).otf');
//}

function setup() {
  createCanvas(windowWidth, windowHeight);
  frameRate(10);
  
  input = createInput();
  input.position(300, 405);

  button = createButton('Wish it');
  button.position(input.x + input.width + 5, 405);

  greeting = createElement('h1', 'Make a wish!'); // works because of the p5 dom library!
  greeting.position(300, 345);

  textSize(120);
  
  button.mousePressed(load);
  const wish = input.value();

}

function draw() {
  background(255, 204, 0);
}

function load() {
  let ledMode = "mode/4/o";
  console.log(url+ledMode);
  httpGet(url+ledMode, 'json');

  wish = input.value();
  console.log(wish);
  if (wish!=""){
    let ledOn = "digital/4/1";
    console.log(url+ledOn);
    httpGet(url+ledOn, 'json');
    greeting.html('Wishing for ' + wish + ' ?');
    input.value('');
    servoPos();
  }
  else {
      greeting.html('Make a wish!');
  }
}

function servoPos() {
  console.log('servoPos function works');
  servoVal= wish.length;
  let cmd;
  servoCmd ="servo?params=";
  httpGet(url+servoCmd+servoVal, 'json');
  console.log(url+servoCmd+servoVal);
  let ledOff = "digital/4/0";
  console.log(url+ledOff);
  httpGet(url+ledOff, 'json');
}

Midterm PoC: Lucky Summer Cat

Idea 1

My original plan was to create an expanding shade that can be controlled using a GUI on the browser. I folded the Miura origami and tested it out when I realized that the servo’s motion was too limited even if I sized the paper down to a fourth of its original size (it would never fully open and lay flat). So I pivoted towards a different implementation.

aREST review

Before transitioning to the next idea, I first experimented with the REST library– it seemed to work with the LED but not with the servo or the DC motor 🙁

Onto the next idea–

Idea 2

My plan is to have the temperature reflected on the browser screen so that the temperature can help inform the user as he/she controls the fan speed from the slider on the screen. As long as the fan is in operation, the cat will be moving too. Here’s my setup so far:

Current setup

Next steps would be to make the servo and DC motor + fan (order arriving this weekend) work using aREST, designing the GUI, connecting it to the code, and then building the cat out once everything’s functional.

Interactive Screensaver

My initial plan was to create a simulation of a frosted glass to hide and reveal a background image but I found out through testing that adjusting the opacity using an analog switch was pointless– opacity acted like an on/off switch where if the potentiometer went to 1024, opacity would be 1, else, it would go straight to 0.

I think having a lot of CSS linked to the div on the page also burnt the pot out a bit and started to smell like burnt plastic.

I resorted to creating a stripe pattern using I’s to create a hack “animation” produced by changing the letter spacing. I can imagine making interactive grids and zigzag patterns with it using a variety of keyboard characters.

Fortune cookie

Eric, Julian, and I came up with a different kind of love-machine. We attached a magnetic contact switch onto two halves of a giant fortune cookie. The idea is that the person has to “crack” open the cookie (this turns the switch off) which then prints in the serial monitor the predicted time (in minutes) until he/she meets his/her soulmate.

We came up with the metaphor thinking that it would be a simple and straightforward yet delightful experience.

Before experimenting with the physical interface (the cookie), we set up the circuits following this tutorial that walks through how to monitor the opening of a typically closed door. It didn’t work the first couple of times as we found that:

  1. The Arduino UNO (used in the guide) produced 5V instead of the ESP8266’s 3.3V… meaning, we had to substitute the recommended 10kΩ resistor with a 220Ω one.
  2. We had to rely on our instincts to make sense of the guide (pin numbers and all) in terms of our microcontroller model.

We attempted using a while loop and a higher-level if statement to stop the loop from running once the cookie’s been cracked open so that it only gives one prediction per person. Both didn’t work so, for now, we increased the delay after the loop so that Arduino doesn’t keep spitting out random predictions.

We designed the switch so that it at least looked like a fortune cookie. Its physical appearance would serve as the cue to its operation. The line printed in the serial monitor that reads: ‘Open the fortune cookie’ and the fortune cookie-looking fortune cookie were signifiers. The size of the cookie allowed for deep holes on each side on which the user could grasp onto. The cookie’s holes afforded gripping and pulling apart. We also stuffed the pocket with tissue and enclosed in some egg carton cells under each half to keep the user’s thumb from going too deep into the cookie which makes it harder to pull apart. By doing this, we designed constraints to limit mistakes that our users could commit.


To keep the two halves ‘stuck’ like a complete fortune cookie, we glued velcro patches where they should be connected in its pre-cracked state.