Midterm Project Button Communicator

So for my midterm project I envisioned a button that would communicate some sort of message when pressed a certain amount of times. Lets say, 3 presses would say “I need to use the bathroom” and 4 would be “I’m hungry!”. This would help people who need assistance to do something. Depending on the number of presses a different message would pop up on a screen somewhere on a web page. I could use the serial monitor in order to display the messages, but I couldn’t get messages to display on the html page. Maybe because of a fast refresh rate of the page or something in my code. But I kept getting stressed about why my code wasn’t working.

So while I was thinking about what to do, I thought about the Lifeline commercial where old people fall and they say “Help I’ve fallen and I can’t get up”. I don’t know why, but I thought that was kind of funny because how fake their acting is in the commercial and the memes that came from it. So I decided to make it display at least that message.

The is my breadboard set up for this project.

My code for the set up was pretty simple and I’ve included it in a github here, https://github.com/ninjadan56/Midterm-Net-devices.

My web-page was real simple, it only displayed LifeLine and then waiting for response right below. When the button was pressed it would display “Help!”. This is a video of me demonstrating the button.

Lucky Cat Wave

I simplified my original plan and instead created a cat that waves to grant your wishes! For my setup, the microcontroller (server) returns a physical response (the cat waving) upon the browser’s (client) request.

Just submit your wish through the form on the browser UI and the lucky cat will wave for each character in your wish to grant it 🙂

In terms of the interaction, the command “Make a wish!” would prompt the user to enter his/her wish. Upon clicking the “Wish it” button (which affords clicking/pressing), the prompt returns a feedback “Wishing for _______ ?”. In addition to this, the “bell” attached to the cat’s collar would light up while its right paw waves. Once the waving is done, the light goes out.

The light as a signifier was helpful when I was first testing the servo on the cat. Because I put the ledOn and ledOff commands before and after the servo command, I could tell whether the servo was responding without waiting on it forever. As for the physical cat, I used a combination of modeling clay (everything but the arm) and Play Doh (just the arm). My guess is that the servo wouldn’t move because the clay arm was too heavy.

It works 🙂
let url = "http://192.168.1.106/"; // string to hold URL
let servoVal = 0; // variable that holds the servoVal
let input = "";
let button, greeting, wish;

//function preload() {
//  // Ensure the .ttf or .otf font stored in the assets directory
//  // is loaded before setup() and draw() are called
//  font = loadFont('assets/MADE Evolve Sans Bold (PERSONAL USE).otf');
//}

function setup() {
  createCanvas(windowWidth, windowHeight);
  frameRate(10);
  
  input = createInput();
  input.position(300, 405);

  button = createButton('Wish it');
  button.position(input.x + input.width + 5, 405);

  greeting = createElement('h1', 'Make a wish!'); // works because of the p5 dom library!
  greeting.position(300, 345);

  textSize(120);
  
  button.mousePressed(load);
  const wish = input.value();

}

function draw() {
  background(255, 204, 0);
}

function load() {
  let ledMode = "mode/4/o";
  console.log(url+ledMode);
  httpGet(url+ledMode, 'json');

  wish = input.value();
  console.log(wish);
  if (wish!=""){
    let ledOn = "digital/4/1";
    console.log(url+ledOn);
    httpGet(url+ledOn, 'json');
    greeting.html('Wishing for ' + wish + ' ?');
    input.value('');
    servoPos();
  }
  else {
      greeting.html('Make a wish!');
  }
}

function servoPos() {
  console.log('servoPos function works');
  servoVal= wish.length;
  let cmd;
  servoCmd ="servo?params=";
  httpGet(url+servoCmd+servoVal, 'json');
  console.log(url+servoCmd+servoVal);
  let ledOff = "digital/4/0";
  console.log(url+ledOff);
  httpGet(url+ledOff, 'json');
}

Midterm Prototype | jh5363

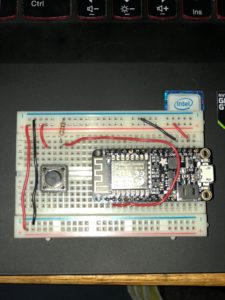
So for the midterm I decided I wanted to something with finding poorly secured WIFI networks with the portability of the ESP8266.

My original plan was to use a GPS module I had picked up and once I had found a weakly protected network I would send the SSID, Password, and coordinates up to a web page. Then the webpage would be able to display a map of all the networks found with the corresponding SSID and password so if you ever knew you were going to be around a certain area and wanted to access a wifi network you could.

Big problem I encountered is that the GPS module was giving me basically no real readings about the coordinates. I dunno if the board is just faulty or if it isn’t able to pick up signal that well within the city but supposedly the type I picked up was meant for automobiles so I would think it would work a little better than that. (part = ublox GPS6MV2)

SO I scrapped the GPS part of the project for now and continued to work with the finding weak passwords part of the device. The difficulty here is that there are a limited number of passwords I would be able to test for each WIFI network for two reasons: first, it sometimes takes up to 5 seconds to connect to the WIFI network from the ESP8266 and therefore we would have to wait until five seconds have passed in order to judge the validity of each password guess, and second, there is very limited memory on the ESP8266. Because of the first problem we know we can’t do a full brute-force which would check every possible letter/number combo and because of the second problem we are limited to the number of password guesses we can store within the memory natively. That being said, I used a list I found of the top 100 most commonly found wifi passwords.

Now the plan is to attempt to crack the password using one of the most common passwords and once I successfully connect to a wifi-network I would send up the SSID and password to the web server. This would of course work theoretically because once connected to the wifi network the ESP8266 would have internet access and could make any GET or POST request it wants.

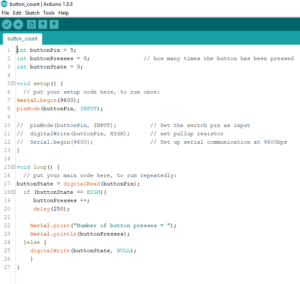
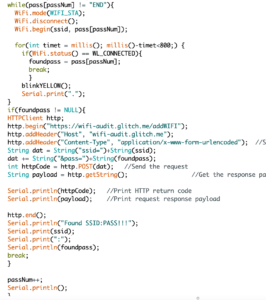
Here are pictures of the code responsible for the POST request from the microcontroller and the serverbside code which gets the data and stores it:


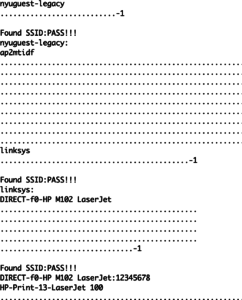
And here is an example of the password cracking in action (it actually works!):

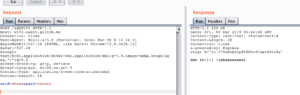
Minor problem thought, haven’t quite figured out how to make the HTTP requests go through. For some reason the client keeps on failing to connect but this should be fixable. Here is a screenshot of a request and response I simulated through Burp Suite to ensure the server is working appropriately:

I think this is going to be a really cool project but I need to solidify a couple things first. One main thing is that if it finds a “network” and corresponding password but that network isn’t a true network for internet access (such as a printer network as shown in screenshot) or there is an additional authentication mechanism (as in nyu-guest) then it won’t be able to send that request to the server. What it should do instead is store the found credentials and send them when it finds a network which it can reach the internet through. Or it could drop them because they aren’t necessarily useful for gaining network access but maybe could be useful for something else so I think its best to keep them in consideration for now. Additionally there is the question of if I want to keep pursuing the GPS aspect of the project. I think this is probably the coolest part of it considering without it all that is visible are a list of SSIDs and passwords but we have no idea where they are. This is fine if we just wanna check the ones in our surrounding area but say I wanted to jump on my skateboard and ride around the city finding weak wifi passwords, at the end I would just have a list of SSID/Password combos and not know where to go to find the WIFI networks. There is a arduino library I found which uses surrounding wifi networks and one wifi network which I can connect to in order to determine the coordinates using a google API. I can’t say how reliable this is but it’s a possibility and I would definitely be interested in trying to get it to work with GPS somehow.

Midterm Description: Button communicator

For my midterm project I thought of how I could make my button counter better. I wanted to help people who have a difficult time communicating through words. For example, a different amount of clicks would communicate something.

1 – I need water/food

2 – I need to go to the bathroom

3 – I feel sick

For now, I have gotten the basic counting to work and display on the serial monitor. In order to make it communicate different things I would need different “if” statements that would give different outputs according to different inputs. I would also like it to display on maybe a web server or html site in order to have a better display. I also still have a hard time making it communicate with a server.


Midterm Project – “The Librarian”

With midterms and all of the craziness leading up to spring break, I’ve been finding lately that all I want is some peace and quiet. That is what inspired my midterm project. My device, “The Librarian” reads in the noise level from an on-board microphone, and if the noise level exceeds the chosen threshold then an alarm and siren go off, to signal that you need to quiet down!

I had expected that the fab lab would have some form of microphone/sound input, but wasn’t able to find any there, and no microphone was included in my Adafruit kit, so I just ordered a microphone that should be coming in next week.


fruit

Wired Miniature Electret Microphone

To polish this off and make it midterm ready, I need to integrate the microphone, and create an on screen, web based GUI where the user can set the maximum sound level before triggering the alarm, so that they can set it to their preference.

To be completely honest, there is still a lack of clarity for me on how a lot of the connection stuff works. I understand all of the circuitry, and even the code, but not quite how the networking works. I was able to control padding on a webpage from an analog input, but not quite sure how to turn that around and change something analog from a webpage.

I will need to deepen my understanding on how that works in order to complete this project.